


Snowman Linzer Cookies
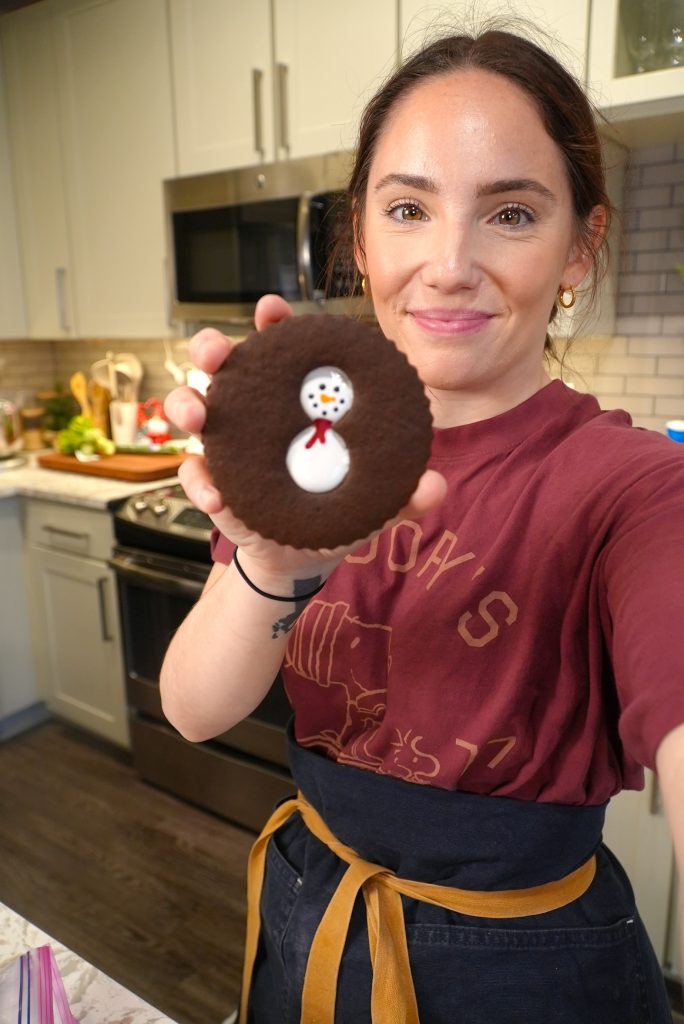
These Snowman Linzer Cookies are so fun & delicious. They’re made with chocolate cookies and a marshmallow filling, making them resemble the flavors of hot cocoa but with an adorable decorative snowman in the center of each cookie. All of these details make this the perfect Christmas Cookie recipe. Feel free to decorate your little snowmen however you wish, and I hope that you enjoy this recipe as much as I do :)

How To Make Snowman Linzer Cookies
This recipe is extremely easy to make and so delicious :) I’m going to break down this recipe into simple steps so that you’re left with the most delicious Christmas Linzer cookies.
- Prep the pans: Line two cookie sheets with parchment paper and set aside.
- Mix dry ingredients: In a medium bowl, whisk together the flour, cocoa powder, baking soda, and salt.
- Cream butter and sugar: In a stand mixer or large bowl, beat the butter and sugar until light and fluffy (about 2 minutes).
- Add eggs and vanilla: Mix until smooth, scraping the bowl as needed.
- Combine wet and dry: Slowly mix in the dry ingredients until a soft dough forms.
- Roll out the dough: Place it between two sheets of parchment paper and roll to 1/8″–1/4″ thick. Transfer to a cookie sheet and chill for at least 2 hours.
- Cut and bake: Preheat oven to 350°F. Cut cookies using a 4” scalloped circle cutter. Cut two small holes in half of the cookies to form the “tops.” Bake 8–10 minutes and cool completely on a wire rack.
- Assemble the cookies: Spread 2 tsp of marshmallow fluff on the bottom cookie, then top with a cutout cookie. Press gently to sandwich.
- Decorate: Tint marshmallow fluff with food dye and pipe eyes, a smile, a scarf, and buttons to turn your cookies into snowmen.

Recipe Tips
- Chill the dough: This step is key! It helps the dough hold its shape while cutting and baking.
- Don’t overbake: The cookies will firm up as they cool, so pull them out while still soft in the center.
- Use parchment or silicone mats: This keeps the cookies from sticking and ensures even baking.
- Keep fluff manageable: If the marshmallow fluff feels too sticky to spread, chill it for a few minutes before assembling.
Tips For Decorating Snowman Linzer Cookies
- Use small piping bags or zip-top bags: Snip a tiny corner for easy control.
Outline with a toothpick: If precision is tricky, lightly sketch where the eyes, nose, and scarf will go before piping.
Play with colors: Traditional snowmen use orange for the carrot nose, black for eyes and buttons, and red or green for scarves. You can even add shimmer with edible glitter or metallic sprinkles!
Add personality: Vary the smiles or scarf designs to give each snowman a unique expression.
How to Store Snowman Linzer Cookies
These cookies store perfectly, which also makes them a great recipe to make ahead of time when the Holiday season starts to feel hectic :)
- At room temperature: Keep them in an airtight container for up to 3–4 days.
- In the fridge: Store for up to a week, though they’re best enjoyed fresh.
- Freezing: Freeze unfilled cookies (without marshmallow fluff) for up to 2 months. Thaw at room temp, then fill and decorate when ready to serve.
Recipe Variations
- Peppermint Linzer Cookies: Add 1/2 tsp peppermint extract to the dough and a crushed candy cane garnish.
- White Chocolate Filling: Swap the marshmallow fluff for white chocolate ganache for a richer flavor.
- Classic Linzer Style: Use raspberry jam instead of fluff for a fruity, traditional take.
- Gluten-Free Option: Substitute a 1:1 gluten-free flour blend for the all-purpose flour.
More Recipes You Might Enjoy!

Christmas Brownies

Copycat Chocolate Little Debbie Tree Cakes

Yukon Cornelius Pull Apart Cupcakes

Snoopy Halloween Cookies

Copycat Little Debbie Pumpkin Delights

Nightmare Before Christmas Chocolate Sugar Cookie Bars
Snowman Linzer Cookies
Join my creative baking community! In depth courses, direct access to me, and more 🤎 Click here to join!
12-15
servings30
minutes10
minutesKeep the screen of your device on.
Ingredients
2 cups all-purpose flour
1 1/4 cups unsweetened cocoa powder
1/2 tsp. baking soda
1/4 tsp. salt
1 cup unsalted butter, room temperature
1 cup granulated sugar
2 eggs, room temperature
2 tsp. vanilla extract
- Filling
1 1/2 cups marshmallow fluff
food dye
Directions
- Prepare two cookie sheets by placing parchment paper on each. Set aside.
- In a medium-sized bowl, whisk together the flour, cocoa powder, baking soda, and salt. Set aside.
- In a separate, larger bowl or in the bowl of a stand mixer fit with the paddle attachment, cream together the butter and sugar. Scrape down the sides of the bowl as you go. Cream the butter and sugar together until the mixture is light and fluffy and fully combined – about 2 minutes.
- Add the eggs and vanilla to the butter mixture and continue to mix on low speed, scraping down the sides of the bowl as you go.
- Once all the wet ingredients are evenly combined, add the dry ingredients to the wet. Mix until a dough starts to form, then scrape down the sides of the bowl, then finish mixing the dough until everything is nice and evenly combined.
- Transfer the dough onto a piece of parchment paper. Place another piece of parchment paper on top of the dough, then use a rolling pin to roll out the dough to about 1/8″-1/4″ thick. Transfer the rolled-out dough to a cookie sheet and let it chill in the fridge for at least 2 hours.
- Preheat the oven to 350 degrees F. once the dough has chilled.
- Cut out as many cookies as you can, re-rolling the scraps until all of the dough has been used up. The dough may become soft and hard to work with the longer it sits out, so transfer it to the fridge as needed to keep it firm and easier to work with. I used a 4″ scalloped circle cookie cutter.
- After all of your dough has been used up, use two small circle cookie cutters of the back of two different sized piping tips to cut out two small circles out of half of the cookies. These will be the tops of the Linzer cookies.
- Place the cookies onto a cookie sheet fitted with parchment paper about 1 1/2″ apart. Bake for 8-10 minutes. Transfer the cookies to a wire rack and let them cool completely before decorating.
- Once the cookies have cooled completely, spread an even amount of marshmallow fluff on the backside of one cookie (about 2 tsp. of fluff per cookie). Top the fluff with another cookie that has the two holes punched out of the top. Press them together gently.
- Repeat these steps for each cookie. Once each cookie is filled, dye the remaining fluff black, red, green, and orange. Place these colors in piping bags.
- One cookie at a time, pipe eyes, a smile, a nose, a scarf, and some buttons on each cookie using the pictures above as guidance to decorate these snowman linzer cookies.
- Enjoy!
Did you make this recipe?
I love seeing what you bake on socials! Just tag @thesqueakymixer


