


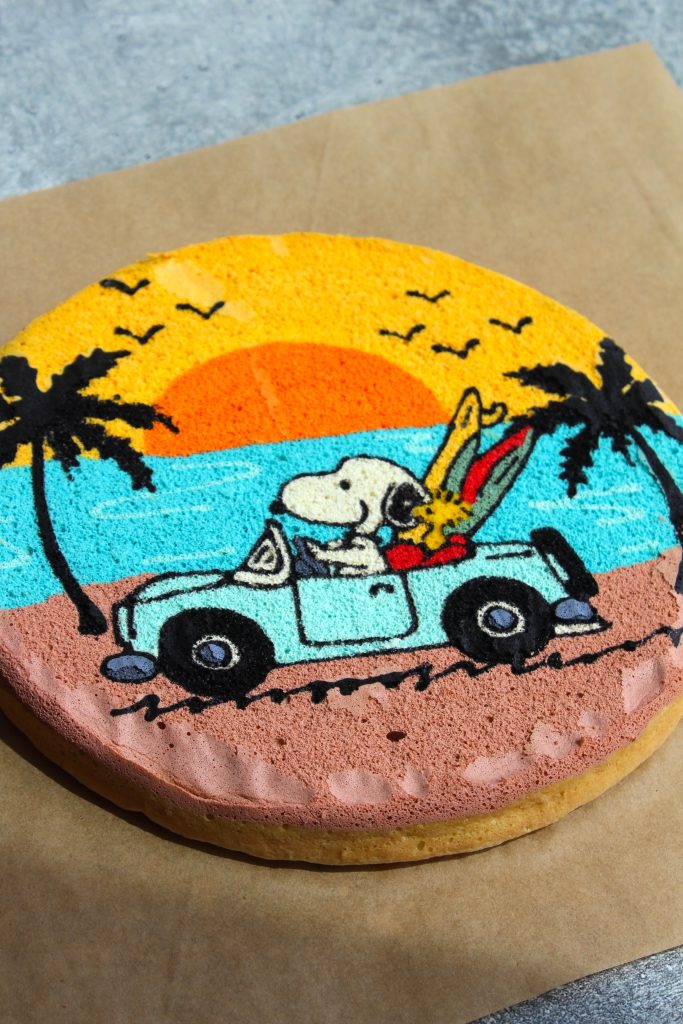
Snoopy Summertime Cake
If you can’t tell by now, I love Snoopy and his pal Woodstock. They’re the cutest combo in the game! I have so much fun making these designed sponge cakes and want you all to have the most success making these as well. This is certainly a more complicated recipe with the designing process but I hope that my Designed Sponge Cake Master Guide helps you throughout the way. Please always feel free to leave comments on any of my recipes for the fastest response so I can help you! :)

How To Make Sponge Cake Batter
- Preparation: Begin by preheating your oven to the specified temperature. Grease your cake pan with cooking spray and line it with parchment paper, ensuring a smooth release after baking.
- Separate Eggs: Carefully separate the egg whites from the yolks, placing them in separate bowls. This division allows us to whip the egg whites to stiff peaks, contributing to the cake’s airy texture.
- Whisk Egg Yolks: In a large bowl, whisk together the egg yolks, sugar, vegetable oil, milk, and vanilla extract until smooth and well combined. This mixture provides the richness and flavor base for our sponge cake.
- Sift Dry Ingredients: Sift the flour and cornstarch into the egg yolk mixture, whisking until a smooth batter forms. Sifting helps aerate the flour and prevents lumps in the final cake.
- Beat Egg Whites: In a separate bowl, use a stand mixer or handheld mixer to beat the egg whites until frothy. Gradually add sugar and vinegar, continuing to beat until stiff peaks form. Stiff peaks ensure the stability and volume of our sponge cake.
- Fold Egg Whites: Gently fold the beaten egg whites into the egg yolk mixture using a spatula. Be cautious not to overmix, as this can deflate the egg whites and compromise the cake’s texture. Aim for a uniform, streak-free batter.
- Colorful Design: Divide the batter into small bowls and dye each portion with gel food coloring to create vibrant Snoopy and Woodstock designs. Transfer the colored batter into piping bags for precise decorating.
- Decorate the Cake: Pipe the colored batter onto parchment paper in the shape of Snoopy and Woodstock. Freeze the designs briefly to set before covering it with the remaining uncolored batter. Bake until golden brown and cooked through.
- Prepare Whipped Cream: While the cakes cool, prepare homemade whipped cream by whisking heavy cream, sugar, and vanilla extract until stiff peaks form. This luscious cream will serve as the filling between cake layers.
- Assemble the Cake: Once cooled, assemble the cake layers with whipped cream between each layer. Optional: Add fresh fruit for a burst of summertime flavor.
- Final Touches: Trim the edges of the cake for a polished appearance, and enjoy the adorable Snoopy summertime sponge cake with family and friends!
How To Make Whipped Cream
Whipped cream adds a luxurious and creamy texture to desserts like our Snoopy summertime sponge cake. Follow these steps to make homemade whipped cream from scratch:
- Chill Your Equipment: Before you begin, place your mixing bowl and whisk in the refrigerator for at least 15 minutes to chill. Cold equipment helps the cream whip up faster and achieve greater volume.
- Gather Your Ingredients: You’ll need heavy whipping cream, confectioners’ sugar, salt, and vanilla extract to make whipped cream. Use high-quality ingredients for the best flavor.
- Whip the Cream: Pour the chilled heavy whipping cream into the chilled mixing bowl. Begin whisking the cream on low speed, gradually increasing to medium-high speed as it thickens.
- Add Sugar and Flavorings: Once the cream starts to thicken, gradually add the confectioners’ sugar, salt, and vanilla extract while continuing to whisk. Taste the whipped cream and adjust the sweetness and flavor to your preference.
- Whip Until Stiff Peaks Form: Continue whisking the cream until it reaches stiff peaks. Stiff peaks are achieved when the whipped cream holds its shape and stands up straight when the whisk is lifted.
- Avoid Overwhipping: Be cautious not to overwhip the cream, as this can cause it to become grainy and curdled. Keep a close eye on the texture and stop whipping once stiff peaks are reached.
- Use Immediately or Refrigerate: Once whipped, use the cream immediately to fill and decorate your Snoopy summertime sponge cake. Alternatively, cover and refrigerate the whipped cream until ready to use.

Gel Food dye V.S Liquid Food Dye
When decorating your Snoopy summertime sponge cake, you may wonder whether to use gel food dye or liquid food dye. Here’s a comparison to help you decide:
Gel Food Dye:
- Concentrated Color: Gel food dye is highly concentrated, meaning you need to use less to achieve vibrant colors.
- Less Liquid: Gel food dye adds color without adding extra liquid to your batter or icing, helping maintain the desired consistency.
- More Control: Gel food dye allows for precise color mixing and detailing, making it ideal for intricate designs like Snoopy and Woodstock.
Liquid Food Dye:
- Ease of Use: Liquid food dye is readily available and easy to find in most grocery stores, making it convenient for last-minute projects.
- Mixability: Liquid food dye mixes easily into batter and icing, but may require more dye to achieve the desired intensity of color.
- Versatility: Liquid food dye can be diluted with water for lighter shades or mixed with other colors for custom hues.

Why It’s Important To Not Over-Mix
Overmixing the sponge cake batter can lead to dense and tough cakes. The key to a light and fluffy texture lies in gently folding the ingredients together until just combined. Here’s why it’s essential to avoid overmixing:
- Preserve Airiness: Overmixing can deflate the air bubbles created by whipping the egg whites, resulting in a dense and heavy cake. By folding the ingredients gently, you retain the airiness and lightness of the batter.
- Maintains Structure: The delicate structure of the sponge cake relies on the stability of the egg whites. Overmixing can cause the proteins in the egg whites to break down, leading to a collapsed and sunken cake.
- Prevents Tough Texture: Overworked batter can develop excess gluten, resulting in a tough and chewy texture. By handling the batter with care and folding it gently, you ensure a tender and moist cake crumb.

How To Avoid Deflating Egg Whites In Cake Batter
Deflating egg whites can sabotage your efforts to create a light and airy sponge cake. Follow these tips to keep your egg whites fluffy and voluminous:
- Start with Clean Equipment: Before beating the egg whites, ensure that your mixing bowl and whisk are clean and free from any grease or residue. Even a small amount of grease can prevent the egg whites from reaching their full volume.
- Use Room Temperature Eggs: Allow your eggs to come to room temperature before separating them. Room-temperature egg whites whip up more easily and achieve greater volume compared to cold egg whites.
- Add Sugar Gradually: When beating the egg whites, add the sugar gradually, a little at a time, while continuing to beat. Adding the sugar slowly helps stabilize the egg whites and create a smooth and glossy meringue.
- Avoid Overbeating: Stop beating the egg whites as soon as they reach stiff peaks. Over-beating can cause the protein structure to break down, resulting in a weaker meringue that is prone to deflating.
- Fold Gently: When folding the egg whites into the batter, use a gentle and deliberate motion to avoid knocking out the air. Fold just until the egg whites are fully incorporated, being careful not to overmix.

Designed Sheet Cake – Master Guide

Designed Swiss Roll – Master Guide
Snoopy Summertime Cake
Join my creative baking community! In depth courses, direct access to me, and more 🤎 Click here to join!
10-12
servings30
minutes10
minutesKeep the screen of your device on.
Ingredients
12 egg yolks
1/2 cup sugar (for yolk batter)
1/2 cup vegetable oil
1/2 cup whole milk
4 tsp. vanilla extract
2 cup all-purpose flour
1/4 cup cornstarch
1 tsp. white vinegar
12 egg whites
1/2 cup sugar (for egg whites)
gel food dye (not liquid)
- Whipped Cream Filling
2 cup heavy whipping cream
5 Tbsp. confectioners sugar
dash salt
2 tsp. vanilla
fresh fruit, optional
Directions
- Cut your parchment paper to fit your pan perfectly then use an edible marker to trace your desired design onto parchment paper. I am using an 8″ circle pan.
- Preheat the oven to 375 degrees F and grease your pan with cooking spray and line it with the designed parchment paper. This makes three layers of sponge cake. You can also just use a standard-size cookie sheet, note that using a standard-size cookie sheet will only make two layers instead of three.
- Separate the egg whites from the egg yolks. We are using every part of the egg in this recipe so hang onto both. Place the egg whites in a large bowl and the egg yolks into an even larger bowl. Set the egg whites aside, we will need them later.
- Whisk together the egg yolks, sugar, vegetable oil, milk, and vanilla until smooth.
- Sift the flour and cornstarch into the egg yolk mixture. Whisk until the batter is nice and smooth. The batter will be thick. Set aside.
- In the bowl of a stand mixer fit with a whisk attachment, whisk the egg whites from earlier until frothy. Slowly add the sugar and vinegar to the egg whites.
- Whisk the egg whites until stiff peaks form. This is very important. Stiff peaks should be able to stand up straight when the whisk is lifted.
- Add the egg whites to the egg yolk mixture. Gently fold in the egg whites. Be careful not to over-mix the batter. Over mixing will deflate the egg whites and make the batter, thin and runny. Mix until the egg whites are just evenly distributed and the batter has few streaks.
- Use small bowls to dye each color that you will need to make your design. Scoop a bit of the batter at a time into these small bowls to make every color you need. Place each color into a piping bag.
- Pipe the design with your desired colors. Do your best to trace the design that you created earlier, with your piping bag.
- Once you have the design finished, freeze it for 5-8 minutes so it sets and is nice and firm.
- Pipe the original, uncolored batter on top of the frozen design.
- Bake for 8-10 minutes or until golden brown on the edges.
- As soon as the cake comes out of the oven, flip the pan onto parchment paper. The design will be facing up. While the cake is still hot, peel off the parchment paper to reveal the beautiful design. Bake the remaining batter on the same-size pan fit with un-designed parchment paper. The other layers do not need designs since they will be hidden in the layers. They will bake the same way. Let the cakes cool before assembling.
- To make the Whipped Cream, in the bowl of a stand mixer fit with the whisk attachment, whisk the cream, sugar, and vanilla until stiff peaks have formed and you have reached a whipped cream consistency.
- Once the cakes have cooled, layer the cakes with evenly spread whipped cream between each layer, adding fresh fruit is optional. Use the designed sheet cake as the top layer.
- Feel free to trim the sides to clean it up a bit if you wish to give the cake a more complete look.
- Enjoy!
Did you make this recipe?
I love seeing what you bake on socials! Just tag @thesqueakymixer


how do i print out the pattern for the cake design?
Completely loved the recipe, it was supper helpful
Yay!! Thank you so much!